


YouTube is an excellent way of informing others about your products, but it's surprising how many video clips involve the same fundamental errors--everything from interjecting speech with "um," to allowing the camera to lose its focus. Even videos from supposedly professional media outlets can involve a depressing level of amateurism.
The solutions to such sins are often incredibly simple, and just take a few moments to learn and perfect. And if you're going to do something, it's best to do it right...right?
Here are the top six sins frequently found on YouTube videos, along with simple fixes.
1. Erm, Quit It With the, Um, Fillers
The solution is twofold. First, make a bullet point list of all the points you want to make during the video and stick it just below the camera so you can see it at all times. Second, rehearse a few times before going for a take--go through the motions of what you intend to say without actually hitting the Record button.
This is how professional speechmakers sound so fluent. Of course, if you can prepare a full script and learn the words then that's even better, but don't punish yourself if you find yourself deviating from the page during the recording--nobody but you will know. Allow yourself to be flexible.
2. Hold the Camera Steady
Almost everybody suffers from motion sickness to some degree. Wobbly camera work in a video, or zooming in and out, can trigger it very effectively and quite literally make a video presentation unwatchable. My particular hate is when the camera's autofocus fails and everything goes blurry. That's enough to make my eyes water.
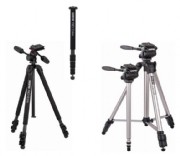 Get a tripod and fix your camera to it. All modern cameras have a tripod mount at the bottom--that's the little round hole near the battery compartment, and it's a universal fitting, so all tripods will be OK.
Secondly, before hitting the Record button, make use of autofocus fix, if your camera has one (check the manual if you're unsure). This will stop the autofocus hunting if the light changes, for example.
Thirdly, never zoom the camera during shooting. If you need close-up detail, shoot it afterwards using macro mode and cut it into the video during editing (you only need to insert the visuals, of course, not the audio).
3. Look Into My Eyes
If your video involves you directly addressing the camera, look into the lens at all times. Don't look away, because it'll make you look shifty or--worse--disinterested. Looking at anything for such a long period of time will feel unnatural, I know, but that's the way it is.
Looking into a camera lens or, often, a little black square at the top of your monitor or laptop case, takes practice and not everybody can do it. The TV presenter David Frost puts at least part of his success down to the fact that he's comfortable doing so, although in his case he's talking to a TV studio camera lens, which is much larger.
There are various tricks you can do to make life easier under the glare of the lens. The main one is to keep your head moving and animated, just like you would in a conversation with another person. Nobody said you have to look square-on at the camera all the time. You can turn your head to three quarters to give a sideways glance, you can frown slightly (if the script calls for it), you can raise your head while you smile, and so on. Such head movements will also make videos more naturalistic and, therefore, compelling.
4. Don't Whisper or Shout
If your video involves different scenes, such as you addressing the camera before cutting to a screencast, then ensure the volume levels of your voice are matched throughout. Most video editors offer a tool called volume normalization, which will do this, although you can look at the waveform view in most modern video editors to judge the volume levels by sight.
This might sound obvious but on many videos I've had to adjust the volume of my computer's speakers to keep up with what's being said.
Ensure that any opening or closing music is matched in with the speech volume too. As a rule, music that's a little quieter than speech is more acceptable than the other way around.
5. Edit, edit, edit
YouTubers seem obsessed with doing everything in a single, long take. If you're an auteur filmmaker then this is forgivable, but splitting everything into smaller scenes and then editing it together later on will allow for an infinitely more professional final product. Remember that television has trained us to accept and even expect cuts during footage. One long take might seem like a more natural concept when you're recording, but the truth is anything but.

6. Light It Right
Bad lighting during a video recording is perhaps the worst sin of all. Apart from making any human subject look shifty, or simply less healthy, it can also cause the camera to lose its focus.
One simple solution is to move the computer or camera to just in front of a window, and recording during daylight. Daylight provides a diffused and encompassing source of light. Be careful if filming on a cloudy day, though, when light levels might rise and fall as the sun disappears.
If you have to use artificial lighting, learn about the principles of key lighting. This involves at one main light source illuminating the subject, supported by one or two other sources of light to fill in the shadows. These can be something as simple as desk lamps. Never, ever rely on a single source of artificial light for your video, unless it's extremely bright and you can bounce it off a wall in front of you so that the subject is covered in a diffused reflected light.


0 comments:
Post a Comment